Saving as images & videos
Mirae WAVE allows you to save the displayed contents in the Rendering Pane as images, or record and save your work progress on the Rendering Pane as videos.
Saving as images
You can save the displayed contents in the Rendering Pane into an image file as follows.
-
In Menu Bar, choose Window menu category.
-
In Save Scene panel, select the background color and set the width and height of the image . Click the Save Image button.

-
In the dialog box, rename or navigate to the folder where you want to save the image, click Save button.

Recording and saving as videos
You can record your work progress on the Rendering Pane and save it as a video file as follows.
-
In Menu Bar, choose Window menu category.
-
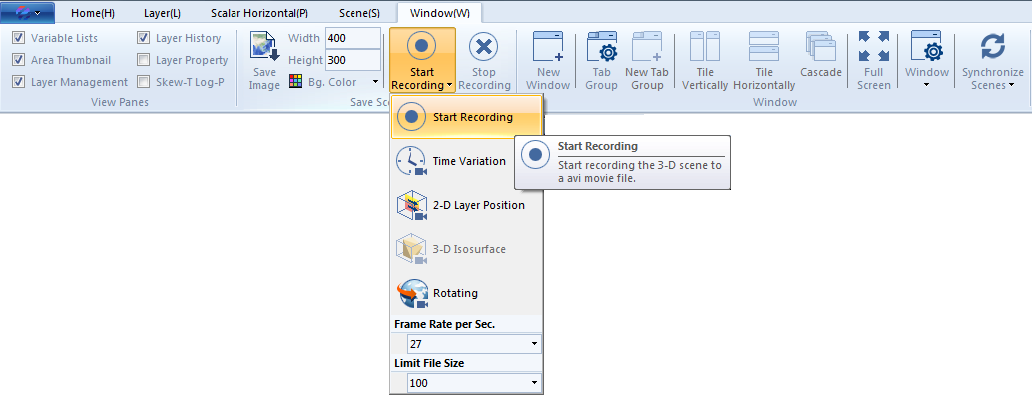
In Save Scene panel, click the Start Recording button. In the drop-down submenu, you can set the frame rate and the size limit of the video file, then select the recording mode.
There are some options for recording modes.
- Start Recording: Start recording the 3-D scene to the avi movie file. Note that this option allows you to freely work (add layers, change the variable, etc.) on the Rendering Pane while recording.
- Time Variation: Start recording the time-variation of the selected layer to the avi movie file. Note that you need to open a list of data files with different time stamps to be able to use this mode (refer to Time Series Data for opening time-variation data files).
- 2-D Layer Position: Start recording the position-variation of the selected 3-D scene to the avi movie file. Note that this mode is disabled if the selected layer is 3-D Isosurface.
- 3-D Isosurface: Start recording the isosurface-variation of the selected 3-D scene to the avi movie file. Note that you need to add 3-D Isosurface layer to enable this mode.
- Rotating: Start recording the rotating 3-D scene to the avi movie file.
-
In the dialog box, rename or navigate to the folder where you want to save the video, click Save button.
-
Select the video codec in drop-down list, and click OK button.
- The dialog will show the list of video codecs installed on your PC.
- If you want lossless compression for the best quality, we recommend Huffyuv or Lagarith.
- If you want to share the video on different devices, try something like Xvid or x264. (MP4)
- If you use the video on Windows only, then you can use 'Windows Media Video X'. (WMV)
- If you don't find any of above options, then try 'Intel IYUV'. (AVI)
-
If you want to stop recording before the size of the video file reaches the limit size, click Stop Recording button (on the right side of Start Recording button).
You can check the recording progress by looking at the status bar at the bottom of the program.
| Previous Page | Home (Table of Contents) | Next Page |
|---|